Engines
Maintenance
Part Sources
Specs & Stats
Articles
Index
Copyright & Terms
Tech Articles |
Back | Index | Next |
Alternator brushes
One of the early warning signs that your brushes may be going, is that the Brake and/or Filter dash lights will come on dimly, especially at low rpm. Of course, this is a general warning that something's wrong with the charging system - it might not be your brushes. Nor does it always happen: in my case there was no warning, except a slight drop in voltage on the dash meter (from 13V to just below 12V, but that was before I cleaned the contacts on the back of the meter).
Of course my brushes went on a Sunday, at the beginning of a 900 km drive back home. I'd had the radio and headlights on, and drained the batteries. But it's a diesel: got a jump, and kept the engine running all the way home. Try that in a FJ!
Changing the brushes is an easy job. It's explained fairly well in the Engine Manual (which I didn't have at the time), but here it is anyway:
- Remove the brush holder cover by removing the two nuts on the top of the alternator.
- How you remove the holder depends on whether you have an IC (internal) regulator or not. Either way, there's at least one screw holding things in, and without the IC there's a nut as well. To completely free the IC, you have a couple wires, and a couple screws to remove.
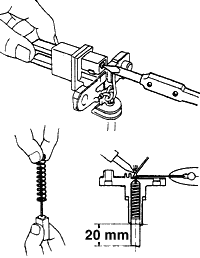
- Once the holder is out, measure the exposed brush length. Standard exposed length is 20.0 mm (for new brushes), and Minimum exposed length is 5.5 mm. If shorter than minimum, replace the brushes.
- Use a soldering iron to melt the solder and remove the brush and spring. The solder might be quite thick, so just hold your iron steady for a minute. Be careful that the brush doesn't spring out, or you could lose the spring.
- Insert the brush wire through the spring, and install the brush in the holder. Solder the wire to the holder, making sure that you have an exposed brush length of at least 20 mm. I basically made the brushes as long as possible, while making sure they were fixed within the holder.
Now while I didn't have the Brake/Filter light problem before the brushes went, I did experience it for a while after I installed the new brushes. When I double checked my installation, I found that the brushes were still "breaking in." That is, the tips were still wearing down, and so the brushes weren't making full contact yet. But the problem has gone away now.

